Spring has been late and chilly with a few warm days thrown in for fun. The Mid Atlantic has been chillier than usual recently, and states north of us have seen a number of late frosts this year. Despite the unpredictable weather, the bearded Iris are doing well.
Author: gardeninthewoods


Wordless Wednesday: Mina lobata

Presented For Your Amusement,
the evolution (not yet complete) of the vegetable garden:
Looking forward to improving this every year!
Wordless Wednesday: Squash Blossoms


Wordless Wednesday, a Day Late


FINALLY, A Real Vegetable Garden!
We moved to the Garden In The Woods in 2009, and it’s take this long to clear, build, dig, mulch and plant the vegetable garden I planned on. It’s not quite complete, but the end is in sight!
A variety of things slowed us down: a broken ankle, health issues, three school age children, and that pesky job that pay for all the lovely plants. The Chief of Implementation has had to help handle all those things AND work too.
Last fall, the Chief of Implementation built an additional 4 raised beds built for a total of 8 central beds. This spring, I dug those beds over with my new Miraculous Broadfork from Meadow Creature, and mulched them heavily. The 6 previously unplanted beds were set up for sheet composting with about a foot of garden debris and a sheet of cardboard under 8 to 12 inches of mulch. Four of these were seeded with clover as a green mulch to prepare for warm season vegetables.
We also worked together to create 8 side beds. Four are finished and planted; the other four will need to be raised beds, which the Chief of Implementation will build when the weather cools down. These side beds contain reseeding or perennial plants and are NOT rotated.
Here’s a diagram of the beds followed by what’s currently planted in those beds:

| Bed | Plants |
| Rotating Bed A | Bed 2 Spring Planting Cascadia Sugar Snap Peas – short variety, devoured by deer Super Sugar Snap Peas – tall variety, devoured by deer Overseeded with
Summer Planting |
| Rotating Bed B | Bed 3 Spring Planting Clover – poor germination and growth; add inoculant next time Summer Planting |
| Rotating Bed C | Bed 4 Spring Planting Tyfon Holland greens Seedling peas Barefoot Farmer kale Salsify Harris Model parsnips Large Prague? celeriac Neon calendula – direct seeded Rossia, Carioca & Soprano Batavian lettuce Rattail radish Calypso cilantro Summer Planting |
| Rotating Bed D |
Bed 1 Summer Planting |
| Stationary Bed A | Spring Planting Mache scallions Chervil (Anthriscus cerefolium) Chinese Temple Bells (Moricandia arvensis) Summer Planting |
| Stationary Bed B | Spring Planting Ladybird poppy (Papaver commutatum) Blue Pimpernel (Anagallis monelli) Ammi majus Borage – direct seeded and started inside Summer Planting Verbena bonariensis – started inside |
| Stationary Bed C | – UNDER CONSTRUCTION – |
| Stationary Bed D | – UNDER CONSTRUCTION – |
| Stationary Bed E | Spring Planting Miner’s Lettuce (Claytonia perfoliata) Cilantro – reseeded late spring & midsummer Crimson Forest bunching onion – no survivors Nigella bucharica – no survivors Summer Planting |
| Stationary Bed F | Spring Planting Black Swan poppy (Papaver lacinatum) Linaria maroccana ‘Licilia Peach’ Ambrosia (Chenopodium botrys) – no survivors Summer Planting |
| Stationary Bed G | – UNDER CONSTRUCTION – |
| Stationary Bed H | – UNDER CONSTRUCTION – |
Wordless Wednesday: Lilium ‘Bonbini’

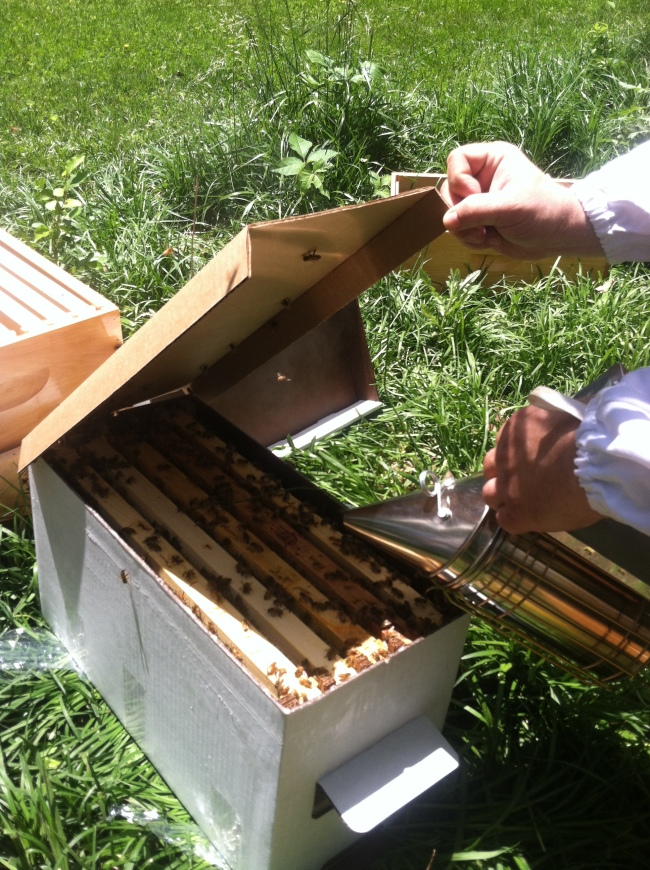
Checking In On Our Girls
Some beekeepers wait longer than just one week before they check in on their bees, but we’re excited and impatient, so we’re checking our hives today! Here’s the Chief of Implementation in his bee jacket and hood, wearing light colored clothes. He’s smoking the top of the hive where the feeder is. Once again, he’s done an excellent job with the smoker and it’s producing dense white smoke that is COOL so we don’t blow hot thin smoke on the bees.

We’ll be checking each frame on each hive looking for several things. First, how full is the hive?

The top super isn’t very busy, so the frames may not be filled. It’s important that the queen has enough room to lay eggs, and the workers have enough room to raise brood, store honey, bee bread, and pollen. If the bees are crowded, they’re more likely to swarm.
Sure enough, there’s NO honeycomb on this drone frame. Drone eggs are usually laid in slightly larger cells, and encouraging the queen to lay all her drone eggs together makes it easier to control varroa mites.

There is some new comb hanging off the bottom of this frame. When bees build comb outside of frames, it’s called burr comb. Our bees are a race within the bee species (Apis mellifera) called Carniolian, and are are especially prone to making burr comb. The big advantage of Carniolian bees is that they are VERY gentle. Here’s are a couple of pictures that show just how gentle they are.


Next, we look for brood at a variety of stages of development and plenty of comb being used for food storage.

This is freshly drawn comb, which is why is SO pretty and white. The lower left quarter has eggs. They look like tiny strings standing in the bottom of the cells. The center and the upper right quarter shows yellowish pollen or bee bread. This provides protein for hungry bees. The upper right quarter also shows honey. It’s a very light colored liquid because the bees are spending most of their time drawing comb and are eating sugar water rather than flying out for nectar. They’ll fan this with their wings until enough water has evaporated to make honey. They they’ll cap the honey cells.

This is older comb, so it’s a darker color since at least a generations of bees have hatched, grown up and emerged from it with all the attendant mess. There are whitish C shaped grubs visible in some cells in a variety of sizes. There are also capped cells with a slightly convex yellowish cap. These contain pupae which will metamorphose and tear the caps off to emerge.
There are a nice variety of stages, so the queen has been laying well.

Speaking of the queen, we do look for her, but we don’t worry if we can’t find her. There are THOUSANDS of bees in a hive, and it’s easy to miss the one bee that’s a bit bigger than the others. Many beekeepers mark the queen with a dot of paint for visibility. We were lucky and found the queen in one of the hives. She has a green dot.

We were a little concerned that we didn’t find eggs or a queen in the other hive, but also noticed what may be queen cells. Near the center of the picture a cell sticks up high above the other cells. There were several similar cells in this hive. It may have lost its queen when we installed it, and started feeding up a few candidate queens, so we’ll be watching it closely.
We also kept our eyes open for any sign of pest damage or illness. We paid attention to the brood pattern. When a colony is healthy, brood cells form a fairly dense sphere centered on the available frames. Honey is stored on outer frames and upper frames generally.
Our girls are doing well!
Introducing Our Girls!
After years of studying, six weeks of classes, and several months of waiting, our girls were finally ready to move into their new home. We picked them up from a local bee business in nucs. Nuc is short for nucleus, and it’s a small colony of bees with a queen who has proved she can lay eggs and workers who have accepted her. For absolute beginners, I think it’s a little easier than package bees.
A package of bees contains worker bees along with a queen who has mated, but may not have laid eggs and probably hasn’t been around these worker bees before. To keep the queen safe in a package, she’s in a private cage with a retinue of her own workers. When introduced to an unfamiliar queen, workers may kill the queen. Her cage is blocked with a candy cork, and by the time the worker bees eat the cork, they’re (hopefully) ready to accept their new queen.
Our nucs consisted of five medium height frames in a cardboard box with screens added to keep the bees from escaping. We had an interesting drive home because there was a tiny break in one of the screens on one hive! There were a few bees loose in the car trying to figure out where they were.

We set the nucs in the shade and got to work getting their new homes ready. Here’s how the hives looked before we started.

We set the hives up so we could transfer the frames from the nuc as quickly and gently as possible. We started out with two supers (boxes) stacked on each other. The bottom super has 3 frames with wax foundation and will be filled when the five frames from the nuc are added. The second super has 8 frames of foundation, so the bees will be working to fill 11 new frames with comb, start raising brood and storing up honey and bee bread.

The Chief of Implementation lit the smoker and got lovely cool smoke going to calm the bees. Possibly the smoke confuses them. Beekeepers aren’t sure WHY smoking bees works; they just know that it does work.

We smoked the first nuc, waited about 30 seconds and then began carefully transferring frames from the cardboard box to the hive.

Each frame was transferred to the hive with a minimum of disturbance to the bees, being VERY careful not to drop any bees off. There’s always a chance that the queen is one of the bees that falls on the ground, and she’ll most likely die if that happens. Notice that the nuc box is very close to the hive here.

We also made a point of keeping the frames in EXACTLY the same order they were in in the nuc: no need to traumatize our girls any more than needed.
When the box was empty, there were still a LOT of bees in it, so we left the box close to the hive hoping the bees would find their way to their new home.


empty frames for expanding in the second super
One gallon feeder with sugar water in the third super
Empty nuc boxes are close to their respective hives so straggles have time to move to the hive
We added a third super to hold a feeder, and fed each colony a gallon of sugar water so the girls could get right to work building comb in their new home.
The Opposite of S.A.D. and 50 Jars of Jam
I have a dear friend who struggles every winter. It’s dark; it’s cold; the days are short; the sun isn’t around. She has Seasonal Affective Disorder (S.A.D.) and needs extra light in the winter to stay healthy. I have just the opposite problem: I hide when there’s too much light. She’s an anthropologist and assures me that my ancestors didn’t LIVE in caves, but sometimes I’m not so sure.
It’s a funny thing for a gardener–I don’t like summer. I’m passionate about gardening in the fall, weeding, seeding, planting, building. I plan great empires of gardening during winter, reading books, drawing designs, perusing catalogs, winter sowing and continuing to build and plan. I start off with a bang every spring, waiting impatiently for last frost dates, buying and planting great volumes of plants and seeds. Then about June, it gets HOT, and I retreat to my cave in the forest. Okay, it’s not really a cave; it even has windows that show the sunlight outside. This year was hotter than the last couple of years, so I was even less motivated to get outside.
But that undefinable moment has come. Deep inside, I can tell fall is coming. About two weeks ago, I got an urge to venture outside and view the devastation wrought by summer. Surprisingly, the yard’s in pretty good shape. Thank heavens for heavy mulch–where it didn’t keep down weeds, they’re not too hard to pull. So I’m hard at work, pulling weeds, taking inventory of beds, planning what gets added this fall and spring.
I started the year with plans to eat more sustainably–local, organic produce is the ideal, and it’s particularly nice if it comes from my own yard. Then I broke my ankle in February, and I’m still walking carefully and putting ice on it in September. Nothing out of the ordinary for this kind of recovery, but not helpful for gardening on a large scale.
Despite that, I’ve learned a few things. I didn’t make huge changes, but I’ve made some small changes. We’re paying more attention to where our food comes from, and trying to make better choices. We switched to some organic canned goods, tomatoes & peanut butter in particular. I can make ranch dressing from scratch, so my house has one less jar of scary chemicals in it, and it’s something we eat a LOT of.

I’ve visited a farmer’s market or two. I’ve gone berry picking a couple of times. I’ve made my own flavored vinegars (chive flower & tarragon in the spring, raspberry this weekend.) I’ve found at least a few things I love to can. The Onion-Maple Conserve was so popular I need to make another batch. I tried Pomona’s Universal Pectin, and the whole family loves lower sugar berry jam. A conventional recipe calls for 6-1/2 cups of sugar for 4 cups of fruit–we’re made multiple batches with 1-1/2 cups of sugar for 4 cups of fruit. It’s amazingly good, and very easy to make. We’ve gone berry picking the last two weekends, picked about 30 pounds of blackberries and raspberries and canned about 50 jars of jam. There’s also a small batch of blackberry cordial steeping.

